
How to convert a PNG image file to a TIFF

The PNG is a very basic image file with quality resolution. The TIFF, on the other hand, has a lot of complexities that other image file types don’t. Use this guide to learn how to convert a PNG to a TIFF.
What is a PNG?
The PNG image file is a raster image, meaning it is constructed piece-by-piece using different sections. It’s a lossless compression file type, which entails it’s capable of transforming into a much smaller size without losing any of the original resolution or quality.
What is a TIFF file format?
The TIFF image file is a Tagged Image File Format that is extremely secure. In fact, it’s one of the most safe image types available. It also stores metadata within each file, giving users important information about the image without having to open a file.

How to convert using Windows
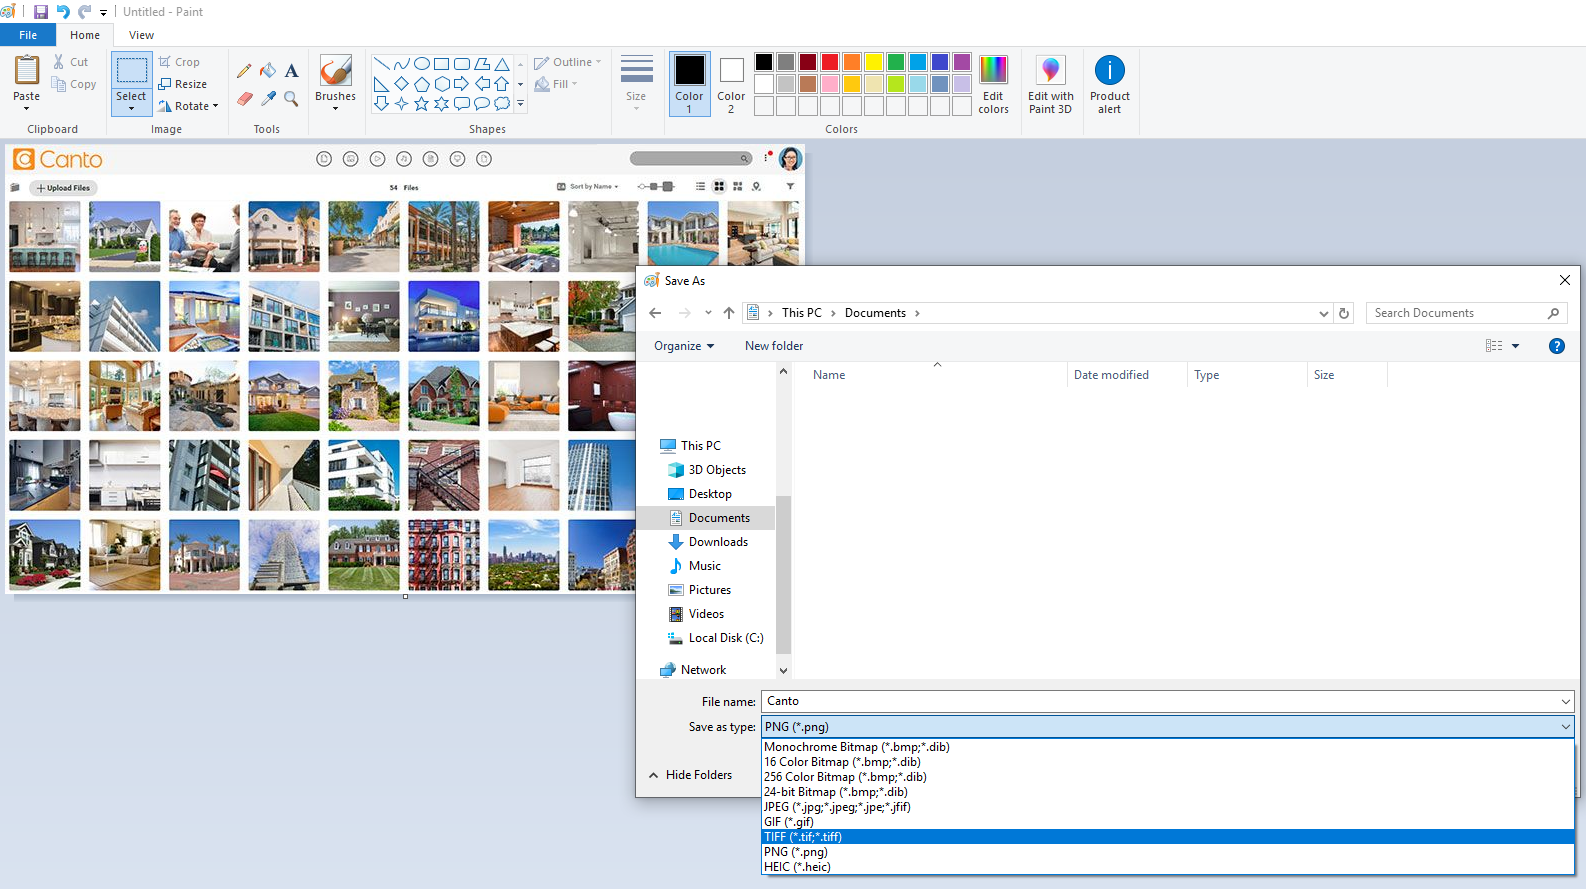
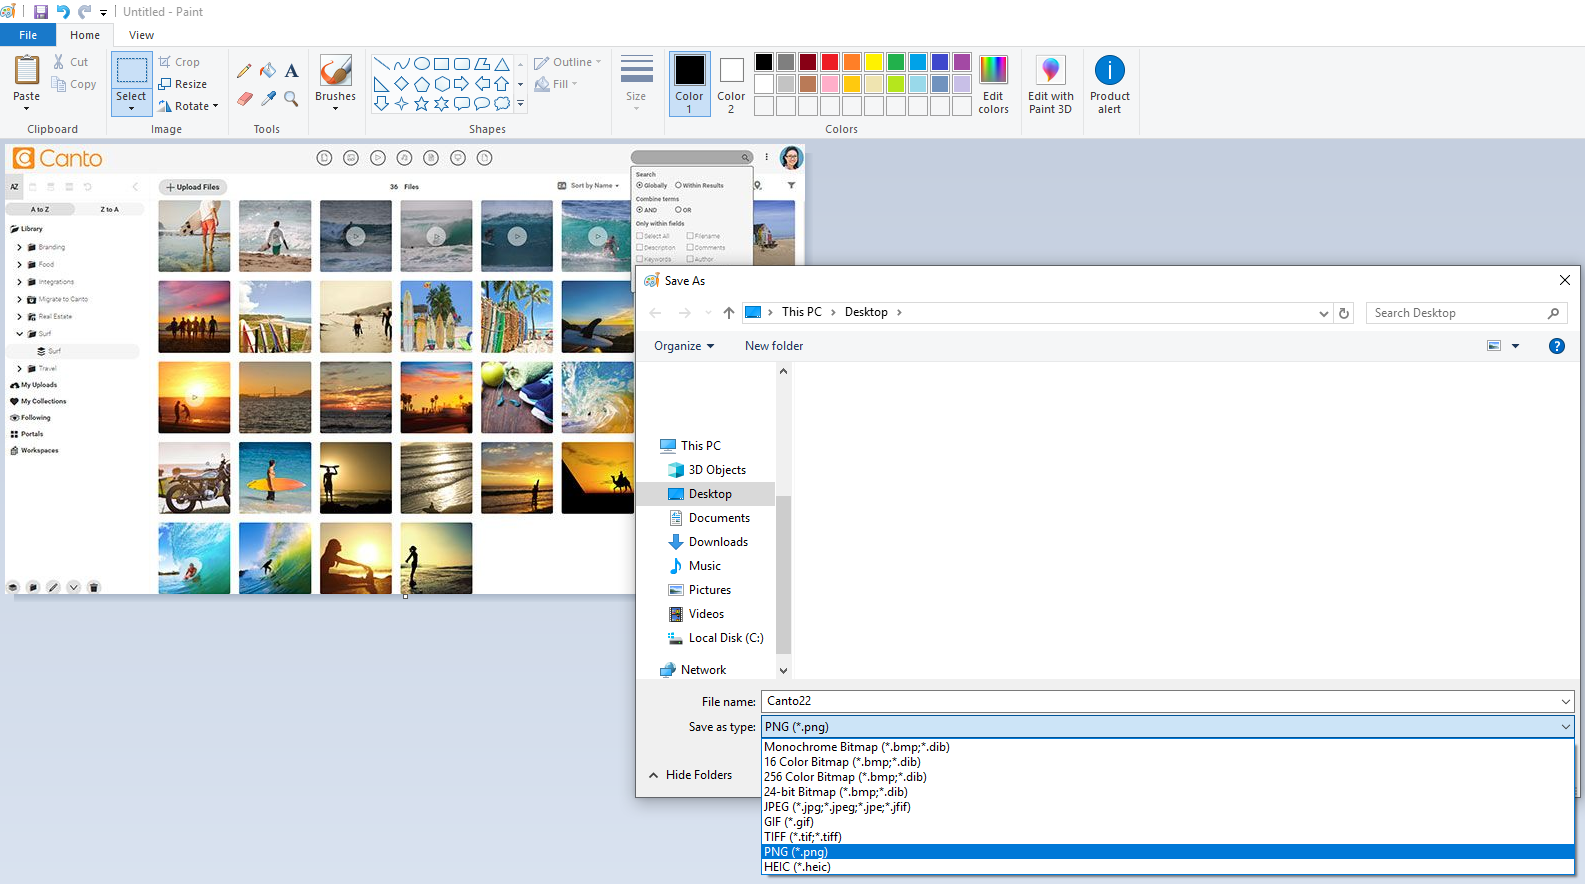
It’s simple to convert a PNG file to a TIFF file using Windows, especially if you just need one file converted. Here’s how to do it:
- Locate the PNG file you wish to convert
- Right-click it
- Select ‘edit’ (or select ‘open with’ then select ‘paint’)
- In the opened paint image, select ‘file’ then ‘save as’
- In the dropdown box under the naming space, select TIFF
- Click ‘save’ and your TIFF file is ready
How to convert using Mac
- Locate the PNG file you wish to convert
- Using ‘Preview’, click ‘File’ then choose ‘Export’
- Choose TIFF from the list
- Click ‘Save’
- Your TIFF file is ready
Remember that these are the most basic ways to convert. If you don’t want to go through these steps each time, a third-party conversion software is the way to go. Furthermore, conversion software might work better for files in bulk.
Online Conversion Options
Converting PNG files to TIFF format can be done online using various tools and services. Here are some options:
Free Online Converters
If you’re looking for a quick and easy way to convert PNG files to TIFF format without spending a dime, free online converters are a great option. Here are some popular choices:
- Zamzar: This well-known online conversion service supports a wide range of file formats, including PNG to TIFF. Simply upload your PNG file, select TIFF as the output format, and let Zamzar do the rest.
- MConverter: Another free tool, MConverter, allows you to convert PNG files to TIFF and other formats with ease. It’s user-friendly and doesn’t require any software installation.
- Online-Convert: This versatile online converter can handle various file types, including PNG to TIFF. Just upload your PNG file, choose TIFF as the target format, and convert.
These free online converters are convenient and easy to use, but keep in mind that they may have limitations on file size and conversion quality.
Paid Online Converters
For those who need more advanced features and higher conversion quality, paid online converters are available. Here are some top options:
- Adobe Creative Cloud: This comprehensive suite of creative applications includes tools for converting PNG files to TIFF. With Adobe’s robust features, you can expect high-quality conversions and additional editing capabilities.
- Convertio: A paid online converter that offers a range of conversion options, including PNG to TIFF. Convertio provides advanced features like batch conversion and higher quality outputs.
- SmallPDF: Known for its simplicity and efficiency, SmallPDF also offers a paid service for converting PNG files to TIFF. It supports batch conversion and provides excellent conversion quality.
Paid online converters often come with more advanced features, such as batch conversion, image editing, and higher conversion quality, making them ideal for professional use.
Batch Conversion and Editing
When you have multiple PNG files to convert to TIFF format, batch conversion and editing tools can save you a lot of time and effort. Here are some options to consider:
- Adobe Photoshop: This powerful image editing software supports batch conversion, allowing you to convert multiple PNG files to TIFF format in one go. You can also make bulk edits to your images before converting them.
- IrfanView: A popular image viewer and converter, IrfanView offers batch conversion capabilities. It’s a great tool for converting large numbers of PNG files to TIFF format quickly and efficiently.
- XnConvert: This free and versatile batch image converter supports over 500 formats, including PNG to TIFF. XnConvert allows you to apply various edits and adjustments to your images during the conversion process.
Batch conversion and editing tools are essential for users who need to convert multiple PNG files to TIFF format. They streamline the process, making it more efficient and less time-consuming.
By incorporating these new sections, the article will provide a comprehensive guide on how to convert PNG files to TIFF format, covering various methods and tools to suit different needs and preferences.
Why batch convert PNG?
The PNG is a very basic image file type and cannot handle a lot of the things a TIFF can. TIFF is known to efficiently hold large volumes of graphic data. It is also space-saving due to its compression capabilities, in which it shrinks in size while not sacrificing a lot of quality. Also, the extensive metadata of TIFF make it ideal for users who need a lot of information about their image files at any given time.

Converting makes sense when the new file type does more for you.
The TIFF is known for its multi-page functionality, something the PNG isn’t capable of. Multiple-paged images should be printed and saved in a TIFF. If you have a project in need of a large amount of printed pages, converting from PNG to TIFF makes a lot of sense.
How to convert back
It’s certainly possible to convert back in case you lose the original PNG file. In order to do so, either use a converter and set it to PNG or use a similar method to the ones above. Here’s a quick outline to convert backward.
Windows
- Locate the TIFF file
- Right-click it
- Select ‘edit’ (or select ‘open with’ then select ‘paint’)
- In the opened paint image, select ‘file’ then ‘save as’
- In the dropdown box under the naming space, select PNG
- Click ‘save’ and your PNG file is ready
Mac
- Locate the TIFF file
- Using ‘Preview’, click ‘File’ then choose ‘Export’
- Choose PNG from the list
- Click ‘Save’
- Your PNG file is ready
This would only be necessary in the result of an accidental deletion of your original PNG file. TIFF files typically don’t fit well into a PNG, so avoid this conversion if possible.
The PNG gives users a foundation for editing and image sharing. However, it lacks the complexity TIFF offers. If you need a complicated solution, convert to the TIFF.