How to Share Google Photos: An Intuitive Guide
| December 20, 2019

If you’re like most users out there, chances are you have a lot of images stored or backed up somewhere on the cloud. One of the possible places you might use is Google Photos, due to their immense popularity. However, let’s say you are looking to share your images off of Google Photos. Would you know how? If not, this guide has all the variations you might need to use and it’s all laid out for you in a simple manner, including the convenience of using shared albums to effortlessly collaborate with friends and family.
Getting Started with Google Photos Sharing
Google Photos is a powerful tool for sharing your favorite memories with friends and family. To get started, make sure you have the Google Photos app installed on your device. If you don’t have it, you can download it from the App Store or Google Play Store. Once you have the app, sign in with your Google Account to access your photos and start sharing.
To share photos, you can use the Google Photos app on your Android or iOS device. The app allows you to store and share photos and videos, and you can access your photos from anywhere using the app. You can also use the Google Photos website to share photos from your computer.
Creating and Sharing Albums
Creating and sharing albums is a great way to organize and share your photos with others. To create a new album, follow these steps:
- Open the Google Photos app and tap the “Albums” tab.
- Tap the “New album” button.
- Add a title to your album and select the photos you want to add.
- Tap “Create” to create the album.
To share an album, follow these steps:
- Open the Google Photos app and select the album you want to share.
- Tap the “Share” button.
- Enter the email addresses or phone numbers of the people you want to share the album with.
- Tap “Share” to share the album.
You can also create a shared link to share your album with others. To do this, follow these steps:
- Open the Google Photos app and select the album you want to share.
- Tap the “Share” button.
- Tap “Create link” to create a shared link.
- Copy the link and share it with others via email, social media, or other means.
Partner Sharing with Google Photos
Partner sharing is a feature in Google Photos that allows you to automatically share your photos with one special person. To set up partner sharing, follow these steps:
- Open the Google Photos app and tap the “Sharing” tab.
- Tap “Partner sharing” and select the person you want to share your photos with.
- Choose the types of photos you want to share, such as all photos or only photos of specific people or pets.
- Tap “Save” to save your partner sharing settings.
Once you’ve set up partner sharing, your partner will be able to view your shared photos in the sharing tab. They can also save your shared photos to their own Google Photos library.
Using a Mac to share images from Google Photos
If you’re on a MAC, you’ll need to use the web version of Photos to start sharing your images directly. Don’t worry though – it’s a breeze! Google Photos allows multiple people to collaborate and share their memories, making it easy for friends and family to contribute and enjoy shared moments. Here’s the step-by-step process:
- First locate the images you want to share
- Create a new folder outside of the ‘Photos’ app
- Move your images into the new folder
- Navigate your browser to Google Photos
- Import the photos from the folder on your Mac to the Google Photos drive
Share from Google Photos app on an Android device

You can share pictures from your storage directly from an Android device.
Sharing pics from Google Photos is easy on any type of Android mobile device. First, make sure you have the Google Photos app installed on the device you would like to use (phone, tablet, etc.). You can also create a shared album, allowing multiple users to view, comment, and add content, which is perfect for events like holidays. You’re now ready to share images to things like phone numbers and emails. Here’s how to do both:
Share with a trusted contact
This is for when you have someone stored in your device contacts already.
- On your selected Android device, open the Google Photos app
- If it’s not already logged in, sign in to your Google account
- Locate the image you wish to share (Note that you can share an entire photo album as well. You can also share video files.)
- Click the three-pronged ‘share’ icon. This will pull open an option window for you to type into
- Locate the contact you wish to share with and select them
- Add a message (optional) and then click ‘send’
Share with a phone number
Use this option when you know the phone number of the recipient.
- Open Google Photos
- Sign-in to Google
- Find the image you wish to share
- Click the ‘share’ icon
- Enter the phone number
- Click ‘send’
The recipient will be able to view photos shared with them.
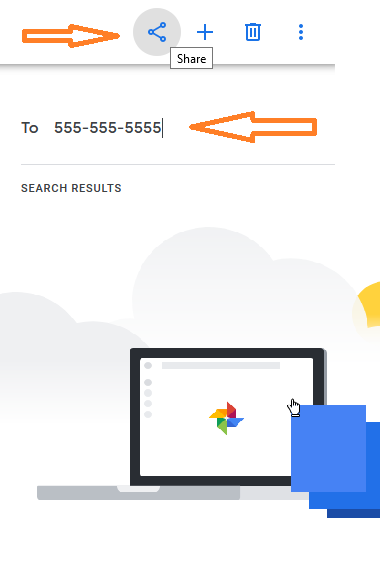
Use the below image as a guide to share with a phone number if you’re still having trouble.

Share your images from Google Photos to a phone number.
Share with an email
Use this option if you know the recipient’s email but not their phone number.
- Open Google Photos
- Sign-in to Google
- Find the image you wish to share
- Click the ‘share’ icon
- Enter the phone number
- Click ‘send’
Share Google Photos images to Facebook
In order to send your images from Photos to Facebook, you need to create a share link for the file. Here’s how:
- Open Google Photos
- Locate the photo you wish to share
- Select the photo and click ‘share’
- Use the link to share on Facebook
Before sharing on Facebook, you can add photos to shared albums, allowing multiple users to collectively view, comment on, and add photos across different devices.
Once you’ve mastered how to use Google Photos, you’ll realize it’s a great way to store images and an even better way to share them. If you’re in need of a specific way to share your images, figure out the types of tools you have at your disposal before digging into the process. You’ll see from the above methods that this process is quite simple. Hopefully you use this information to expand the way you exchange your saved images with others.
Secure Sharing and Access Control
Google Photos provides several features to help you control who can view and interact with your shared photos. Here are some tips for secure sharing and access control:
- Use the “Share” button to share photos with specific people or groups.
- Create a shared link to share your album with others, and set a password to control access.
- Use the “Partner sharing” feature to automatically share your photos with one special person.
- Use the “Face groups” feature to organize your photos by person and control who can view and interact with them.
- Use Google Drive to store and share your photos, and set permissions to control who can view and edit them.
Troubleshooting Google Photos Sharing
If you’re having trouble sharing photos with Google Photos, here are some troubleshooting tips:
- Make sure you have the latest version of the Google Photos app installed on your device.
- Check that you have a stable internet connection.
- Make sure you have the correct permissions set up for sharing photos.
- Check that the person you’re trying to share with has a Google Account and is signed in.
- Try restarting the app or clearing the app’s cache to resolve any issues.
I hope this helps!
