Microsoft Word guide: How to use it completely
| March 3, 2026

If you’re new to Microsoft Word, don’t worry – it’s never too late to learn this important program. Microsoft Word is the most commonly used word processor for Windows.
Learning the basics is quite simple, and you’ll be using this popular tool effectively in no time. In this guide, you’ll cover essential tasks like formatting, comparing documents, and setting up navigation lists, while also building your capability to boost productivity.
Here’s a guide to the fundamentals. There are alternatives to Microsoft Word, but this guide focuses on mastering its core features.
What is Microsoft Word, and what is it used for?
Microsoft Word is one of the most widely used word-processing tools today (often referred to as MS Word or Word) and is a core component of the Microsoft Office suite. Word processing is simply the creation of text on a computer. Microsoft Word is used to create personal and professional digital documents. It is capable of many different tasks, all designed to enhance the experience of text writing.
Microsoft Word is used for:
- Writing letters
- Educational lesson plans
- Articles and books
- Editing documents
- Building resumes
- Creating newsletters
- Many more uses
It sometimes acts as a placeholder for unpublished documents, giving users a chance to build the content of the piece before releasing it to others. It also ensures the creation’s spelling and grammar are acceptable. Users can choose from different template categories to suit their document type.
Microsoft Word allows users to create letters and other digital documents. Users can use the cursor to select, drag, and delete text or objects to structure and organize their documents. Word’s layout and page layout features help organize content and maintain a consistent structure throughout the document.
Users can customize the Ribbon and modify default font settings for efficiency. Word also allows users to paste text without formatting, preserving the current document’s style.
You can format text by changing:
- Font size
- Color
- Alignment
You can also automatically create a table of contents with MS Word. To create a table of contents, style your section titles with headings. You can then use the carrots on the left to easily expand or contract your text.
The Mail Merge feature can be used to produce:
- Letters
- Labels
- Envelopes
To apply a style, select a block of text and click the Style menu in the ribbon — styles help maintain consistent formatting throughout your document.
How to create and save a new document
If you’d like to build a document from scratch, begin by opening your Word program. The app will open to the ‘Home’ tab, where you can choose the template that best fits your needs.
If you’re looking for a blank slate to write on, click the ‘Blank document’ icon.
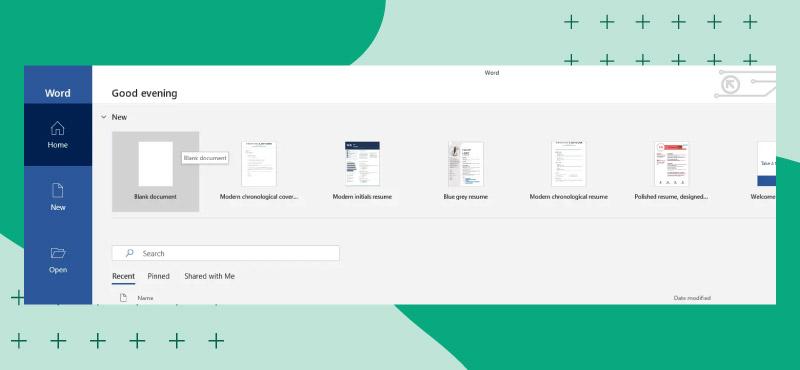
For other things, such as creating a resume or professional letter, find the correct template (there is a ‘more templates’ link underneath the icons if the one you want isn’t visible).
Once you have created your document, save it regularly to prevent accidental deletion or file loss due to hardware or software malfunctions.
One way to avoid this is to use autosave. In the upper left corner, select ‘AutoSave’ by clicking the blue checkbox to ‘On’.
Microsoft Word also features an Auto-Recover function that automatically saves your work at regular intervals to help prevent data loss when working with editable DOCX document files. If you don’t use autosave, make sure you manually save your document regularly as you write.
To save your document, click the blue disk icon located in the upper left corner, or select the Save option from the File menu. If it’s the first time you’ve saved this document, a pop-up window will prompt, requiring you to name the file and provide a location of choice on your computer or on a shared network drive for team access.
If you need to recover an unsaved Word document, open Microsoft Word and look for recovered unsaved documents on the left of your screen.
If you accidentally deleted a Word document, you can retrieve it from the recycle bin or a backup system if available.
The Quick Access Toolbar at the top of the window can be customized to add your most frequently used commands for easy access.
Next, let’s make sure you understand how to tweak some of the text settings.
How to change the appearance and size of your document
Everyone has different text formats and sizes that appeal to them, which vary depending on the type of document they’re creating. The basic formatting of any blank document begins at Calibri (font) 11 (font size). If this is acceptable for your project, there’s no reason for you to change any settings further. However, if you would like a different size or a different text appearance, keep reading.
Locate the toolbar at the top of the page. It should be on the ‘Home’ tab by default. If it isn’t, click the ‘Home’ tab. Next, find the dropdown menu that lists font styles (the current one should be ‘Calibri’). Click it and choose from the list of options until you find the right style.
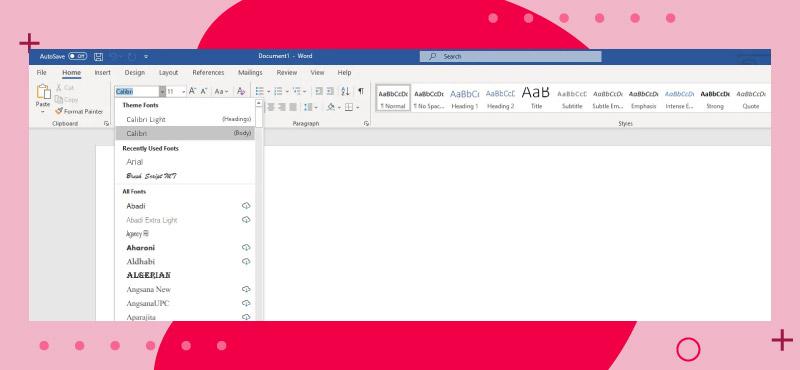
Note that if you change the font, you may end up with a larger size, since some styles are larger than others. Keep this in mind when selecting your font size.
To change your font size, locate the dropdown menu next to the font style. The current size should be ‘11’. Click it and select your new font size.
You can format text in Word by changing the font size, color, and alignment to achieve the desired look. Adjusting text alignment and other formatting parameters, such as line spacing and style, helps ensure consistency throughout your document.
Users can also modify the default font settings in Microsoft Word to save time on formatting future documents. When pasting content, using the ‘normal’ paste option helps maintain the current document’s style without adding extra formatting.
The Zoom feature in Microsoft Word allows you to adjust the view of your document for better readability.
Now that your sizes and styles are configured, you can proceed to add external images and build tables.
How to add tables, page numbers, and graphics
Microsoft Word allows users to input a wide variety of functions into a document. These are particularly useful for projects that require different statistical analyses and data representations.
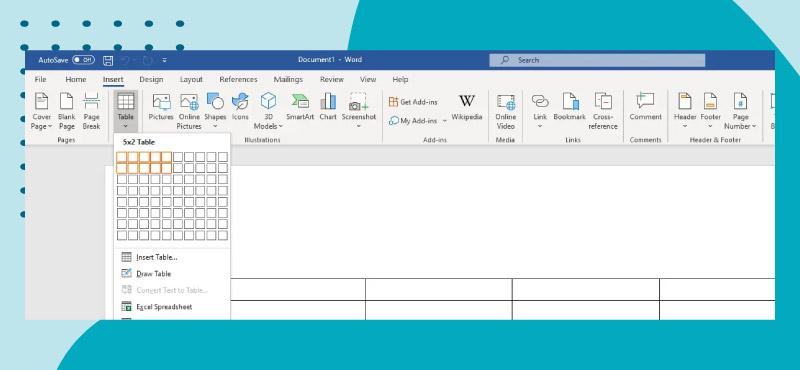
To create a table, start by clicking the ‘Insert’ tab. Under this tab, select the ‘Table’ icon. A dropdown menu will present itself. In this menu, choose the number of rows and columns you want your table to have.
If you are looking for more in-depth data analysis, consider using Excel instead.
You can use layout guides to align tables and text boxes for a structured appearance. Inserting shapes and text boxes is also done from the ‘Insert’ tab, and you can align these objects using layout guides to ensure precise placement. Adjusting margins and spacing between elements improves the layout and structure of your document.
Using master pages or templates helps maintain consistent formatting and alignment across multiple pages. Microsoft Word offers templates in different categories for various document types, making it easier to start with the right structure. You can even create your own templates, further streamlining repetitive tasks.
The print feature lets you prepare your document for printing by checking the layout, margins, and alignment. You can convert your Word document to other formats, such as Word to PDF, for sharing or printing.
To maintain formatting, use the duplicate function when copying content. If your file size is too large, reduce it by compressing images and saving the document in a newer format, such as .docx.
Inserting pictures and page numbers can both be found under the ‘Insert’ tab. To add pictures, click the ‘Pictures’ icon and select the file you want from your computer in the pop-up window.
To insert a page number, click the ‘Page Number’ icon and choose the desired position for the number from the dropdown menu that appears.
Now that you have an idea of how to navigate Word with ease, here are a few fundamental tips to boost efficiency and collaboration.
Collaboration and sharing your document
Collaboration is a key feature of Microsoft Word, making it easy for multiple people to work together on the same document, whether you’re editing a report, building a newsletter, or preparing a team presentation. With Word’s sharing and collaboration tools, you can invite others to view or edit your Word documents in real time, streamlining teamwork and ensuring everyone stays on the same page.
To share your document with others, follow these simple steps:
- Open the Word document you want to share
- Click the ’File’ tab in the upper left corner of the window
- Select ’Share’ from the menu to open the sharing options
- Choose how you want to share your document — either by sending it as an email attachment or by uploading it to OneDrive, Microsoft’s cloud storage service
- Enter the email addresses of the people you want to collaborate with
- Set the permission level for each recipient, such as ’Edit’ if you want them to make changes, or ’View Only’ if you want them to just read the document
- Add an optional message to your invitation
- Click ’Share’ to send the invitation and give others access to your document
When working with others, it’s important to keep track of changes and feedback. Microsoft Word’s ’Track Changes’ feature is designed for this purpose, allowing you to see exactly what edits have been made and by whom. Here’s how to use it:
- Open your document and go to the ’Review’ tab at the top of the screen
- Click ’Track Changes’ to turn on the feature. You can choose options like ’All Markup’ or ’Simple Markup’ to control how changes are displayed
- As collaborators edit the document, their changes will be highlighted in different colors, making it easy to spot additions, deletions, or formatting updates
- You can review tracked changes and decide whether to accept or reject it, helping you maintain control over all the content in your Word document
Pro tip: If you trust your collaborator, have reviewed the content, and don’t want to click through each change individually, you can accept all tracked changes in a single click.
In addition to tracking changes, you can use comments to leave notes or suggestions for your collaborators without altering the main text. To add a comment:
- Highlight the text or object you want to comment on
- Right-click on the selection and choose ’Comment’ from the menu
- Type your feedback in the dialogue box that appears, then click ’OK’ to add your comment to the document
Pro tip: For documents you are collaborating on with multiple people, you can @-mention specific people or email addresses in each comment, helping designate tasks within large projects.
These collaboration tools — sharing, tracking changes, and adding comments — make it easy to manage group projects, gather feedback, and ensure your document is polished and accurate before finalizing it.
Some basic tips to help you along your way
These tips won’t teach you everything there is to know about Word, though they’ll definitely make things a lot easier for you. Mastering essential Word tasks can significantly improve your capabilities and overall productivity.
It’s important to follow clear instructions and take time to explore Word’s features to get the most out of the software. For example, using the Find and Replace text feature lets you make bulk changes to your documents quickly and efficiently.
How to copy, cut, and paste using keyboard shortcuts
At any point while editing, you can highlight specific text and use keyboard shortcuts like Ctrl + C to copy text and Ctrl + X to cut text, which further streamlines your workflow. For those curious about the difference between copying and cutting, copying text duplicates exact text to place it elsewhere, whereas cutting removes exact text to place it elsewhere.
After copying or cutting text, navigate to where you want to paste, then press Ctrl + V. To maintain the original formatting, use the ‘normal’ paste option when pasting content. If you want to remove formatting when pasting (like italics, headings, or bold), use the shortcut for plain-text paste by pressing Ctrl + Shift + V.
How to search inside your document
In order to search inside your document for different words or numbers, hold the ‘Ctrl’ key and press the ‘F’ key. A window will appear, allowing you to type in specific phrases or words you wish to find.
Pro tip: If you have already copied text and hit Ctrl + F, the copied text will automatically appear inside the search bar.
You are well on your journey to becoming a MS Word power user
Learning Microsoft Word isn’t about memorizing every feature at once — it’s about building confidence with the fundamentals and expanding your skills as your needs grow. Most users start with basic formatting and simple documents, then gradually move on to more advanced tools such as mail merge, collaboration features, and layout customization.
The software is powerful and flexible. What determines how effective you become is how consistently you use it, explore its features, and apply the right tools to the type of document you’re creating — whether that’s a resume, report, newsletter, or long-form manuscript.
A few practical next steps to continue improving:
- Practice with purpose: Create different document types (letters, resumes, reports) to apply formatting, styles, tables, and page numbers in real scenarios
- Customize your setup: Adjust default fonts, modify the Ribbon, and personalize the Quick Access Toolbar to streamline your workflow
- Explore collaboration tools: Practice using Track Changes, comments, and sharing options through OneDrive to get comfortable working with others
- Use templates strategically: Start with built-in templates to understand document structure, then adapt them to fit your needs
- Learn keyboard shortcuts: Gradually incorporate shortcuts like Ctrl + C, Ctrl + V, Ctrl + F, and others to increase speed and efficiency
Mastery doesn’t happen overnight, but consistent use makes a noticeable difference. As you continue practicing, you’ll find that tasks which once felt complicated become second nature — and you’ll be able to create polished, professional documents with confidence.
Where you store Microsoft Word documents matters
Choosing the right storage solution for your Microsoft Word documents is essential for accessibility, security, and collaboration. Here are some popular options to consider based on your needs:
OneDrive
OneDrive is Microsoft’s cloud storage service, integrated with Microsoft Word and the entire Office suite. It allows you to save documents directly to the cloud, enabling real-time collaboration and access from any device. Using OneDrive ensures your files are automatically backed up and easily shareable with colleagues or clients.
Dropbox
Dropbox is a widely used cloud storage platform known for its simplicity and reliability. It supports file synchronization across multiple devices, making it easy to access your Word documents anywhere. Dropbox also offers robust sharing features and version control, helping you manage document revisions efficiently.
Canto DAM
Canto DAM is a powerful solution designed for organizations that require advanced file organization, searchability, version control, rights management, and security. A digital asset management platform stores, organizes, searches, manages, and distributes your brand’s digital assets — including docs, spreadsheets, presentations, as well as logos, fonts, imagery, and even other marketing collateral.
DAM software is much more than static storage; it’s an AI-powered content hub that puts teams in an intelligent, intuitive content workspace. Canto also includes robust rights and brand management features (that you won’t get in cloud storage), making it a great choice for high-velocity brands that need to scale content production. Canto integrates with Word, Excel, PowerPoint, and Teams, making it an exceptional choice for Microsoft-powered teams.